
How to make solid soap at home - a guide to making soaps
In a world where awareness of natural ingredients and the desire for DIY creations are growing, making solid soap at home has become a popular hobby. Therefore, more and more people want to know how to make soap, with an emphasis on natural soap. Beyond an enjoyable creative experience, making soap allows for full control over the ingredients and is also more economical. Before starting, it's worth getting to know different preparation techniques, what equipment is needed, and what is the safest way to enjoy high-quality natural soap made at home.

5 Prominent Advantages of Making Natural Soaps at Home:
Compared to buying ready-made soaps from the store, making natural soap at home offers many advantages:
- Full control over ingredients - You can know exactly what the soap contains and not worry about unidentified substances
- Customization and variety - Creating soaps allows you to choose oils, scents, and colors according to taste
- Economic savings - In the long run, homemade soaps can be more economical
- Environmentally friendly - Making soap at home doesn't require packaging and uses natural ingredients
- Satisfying creative experience - True enjoyment from the creation process and the result
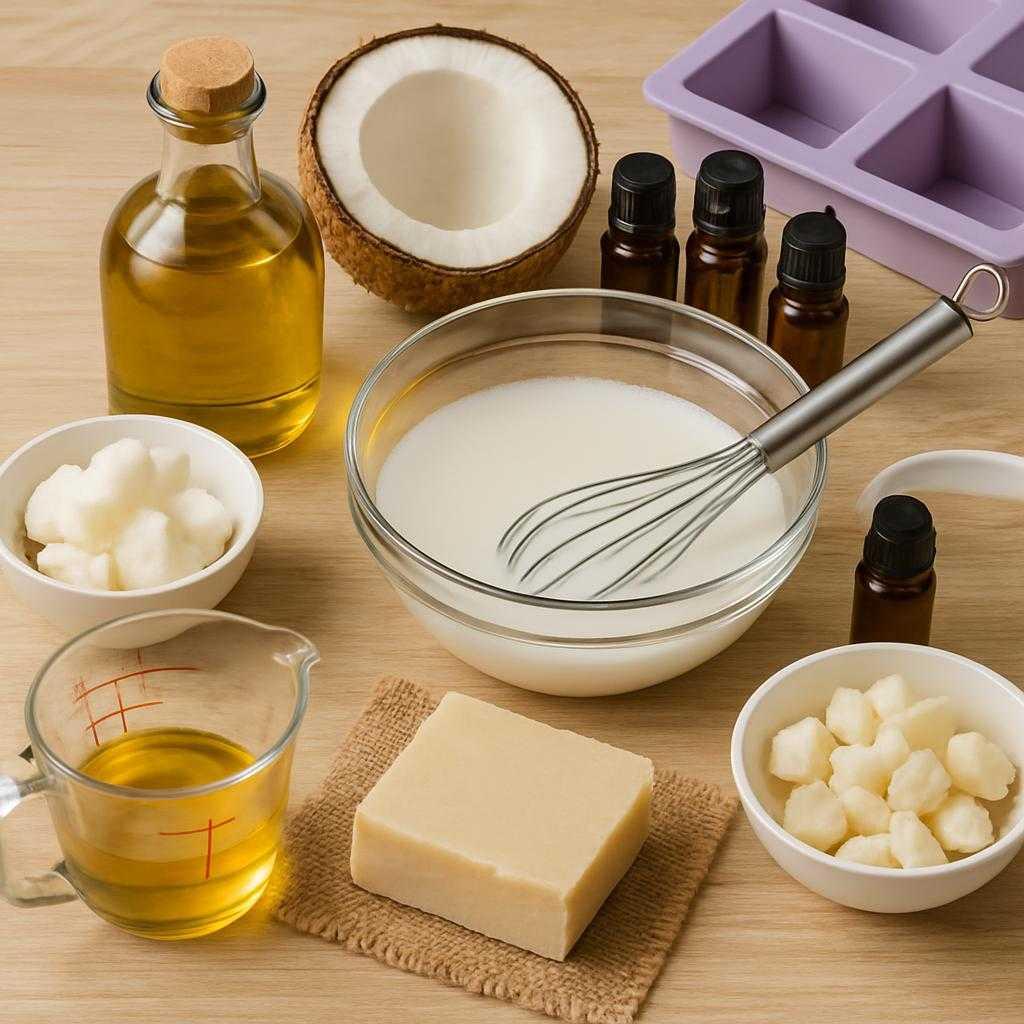
What materials and equipment are needed to make soap?
The tools and materials for making soap at home can vary between methods, but for the initial stage, it's recommended to use the following list:
- High-quality soap base - It's advisable to buy a base made from quality oils and premium butters, containing 100% natural and nourishing ingredients
- Fragrance oils - High-quality essential oils intended for making fragrant soap, free of parabens and phthalates
- Digital thermometer - For accurate measurement during melting and cooling
- Stirrer for mixing soap - To ensure a smooth mixture and full scent dispersion
- Silicone molds - You can choose trays in various shapes
- Melting and measuring jug - A suitable jug for heating in a microwave or bain-marie (over steam)
When it comes to more complex preparation methods, the following materials and accessories should be added:
- Caustic soda (Lye) - The basis for making soap using classic methods, which requires great caution in use
- Distilled water - To create the basic lye solution
- Digital scale - For accurate measurement of quantities
- Protective equipment - When working with caustic soda, it is mandatory to use chemical-resistant gloves, safety goggles, and a long coat
How to Make Natural Soap: 3 Common Techniques
Soap making is an ancient tradition that has existed for thousands of years. In the past, soaps were made from wood ash, animal fat, and salt. Today, with modern knowledge and technology, high-quality soaps can be created from plant-based materials, customized and friendly to the skin and environment. Such soaps are sometimes called "Castile soap," named after the Spanish olive oil-based soap. For those who want to know how to make soaps, here are 3 well-known techniques for making quality homemade soap:
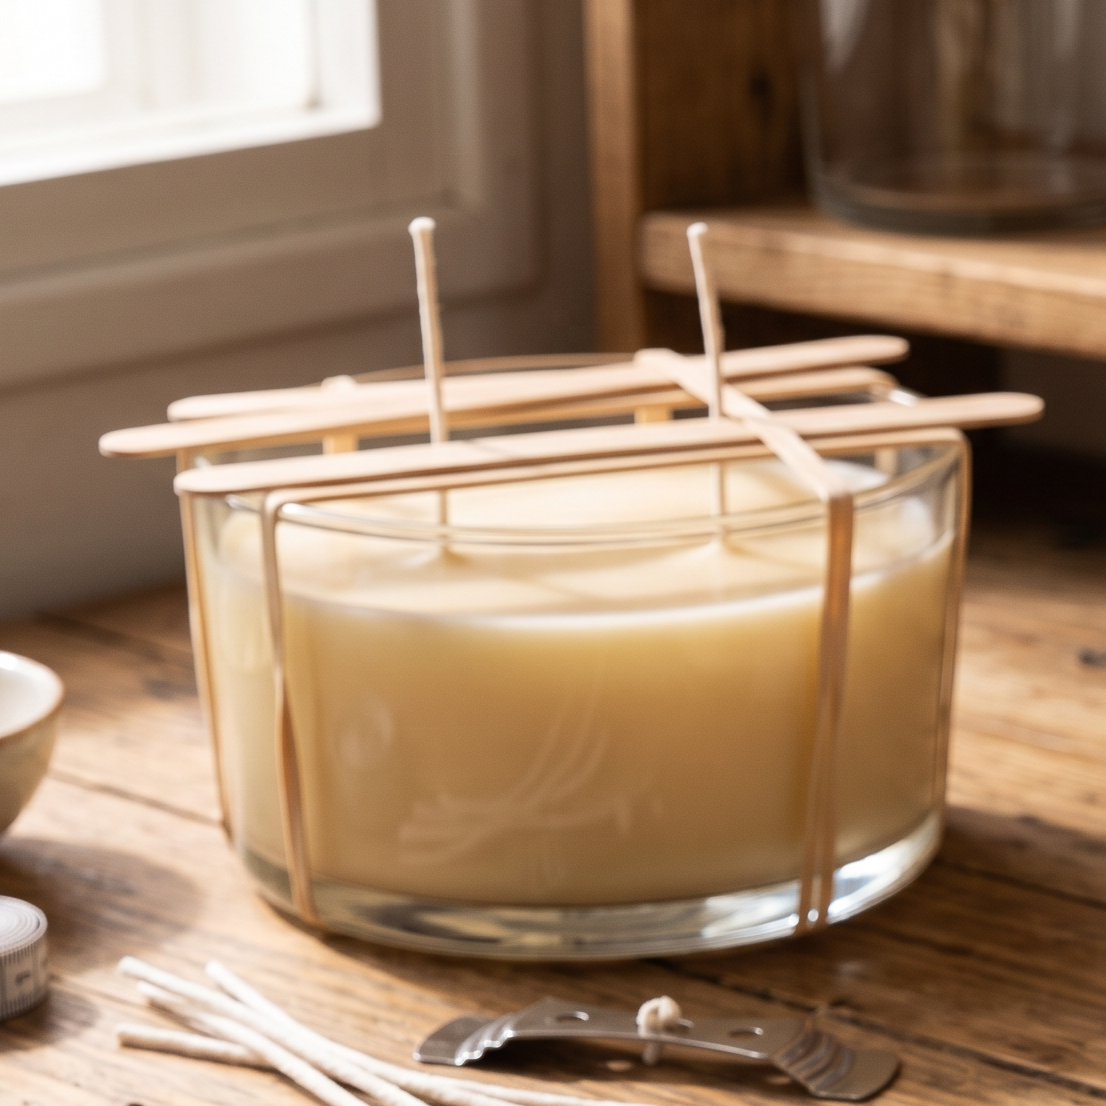
Cold Process Method:
This is a traditional method, where the chemical reaction between the base oils and caustic soda occurs without external heating or with slight and brief heating, only for temperature equalization. The basic steps of the process are:
Step 1 - Prepare a caustic soda solution and wait for it to cool
Step 2 - Heat the base oils to a similar temperature (up to 45 degrees Celsius)
Step 3 - Slowly mix the solution and oils
Step 4 - Add essential oils, colors, and botanicals
Step 5 - Pour into silicone molds and cover
Step 6 - Wait 24-48 hours, unmold, cut (if necessary), and leave to dry and cure for 4-6 weeks
Advantages:
- Preservation of oil and additive properties
- Smooth and pleasant texture
- Great creative freedom in design
Disadvantages:
- Requires prolonged drying and curing
- Requires great precision in temperatures and measurements
Hot Process Method:
In this method, the soap mixture itself is heated to speed up the process. This method requires a slow cooker or a double boiler. Here are the basic preparation steps:
Step 1 - Prepare a caustic soda solution and wait for it to cool
Step 2 - Heat the oils in a slow cooker or over steam until completely melted
Step 3 - Slowly pour the lye solution into the oils and mix
Step 4 - Cover and cook the soap at a low temperature, stirring occasionally. Continue until the mixture turns into a gel and acquires a translucent, Vaseline-like texture
Step 5 - Cool the mixture slightly and add essential oils and botanicals
Step 6 - Pour the mixture into molds and cover
Step 7 - Wait 12-24 hours, unmold, cut (if necessary), and leave to dry and cure for a short period of 1-2 weeks
Advantages:
- Shorter drying time
- Less temperature sensitivity during preparation
Disadvantages:
- Less smooth and uniform texture
- Less design flexibility
- More limited control over the process
Melt and Pour Method:
The most recommended method for beginners, eliminating the need to work with caustic soda. It is important to work with high-quality, natural soap bases to ensure an optimal result. The process is simple and easy:
Step 1 - Cut a high-quality natural soap base into cubes
Step 2 - Melt in a heat-resistant container in a microwave or over steam
Step 3 - Add high-quality essential oils
Step 4 - Pour into silicone molds
Step 5 - Wait 1-4 hours for the mixture to harden
Advantages:
- Safe and easy recipe for beginners
- The soap is ready to use immediately after it hardens
- Many design possibilities
Do you have more questions about making natural soaps at home? Are you unsure which raw materials to choose? The "Sheananda" team will be happy to assist you on WhatsApp, and provide you with all the information and tips on making soaps at home with our high-quality soap bases.
"Excellent product, very easy to use, no caustic soda. Recommended" (Morin)
Important Safety Guidelines
Sometimes, making solid soap involves working with caustic soda, a substance that can cause severe burns if it comes into contact with skin or eyes. Therefore, when asking "how to make soap," the first answer is - safely. Here are some rules to follow:
- Work in a well-ventilated room
- Wear protective equipment
- Keep children and pets away from the work area
- Never add water to caustic soda - always add the soda to water slowly
- Store caustic soda in a safe, dry place out of reach of children
How to Make Solid Soap - 5 Professional Tips for Success
- Accurate calculation - You can use online soap calculators for precise calculation of the required amount of soda
- Quality ingredients - It's worth investing in a good soap base and quality oils
- Documentation - It's recommended to keep a recipe journal to remember what worked better and what less
- Patience - It's important not to rush, or simply work with a method that allows for a quick result
- Start easy - The first steps should be taken with the easiest method (M&P) to easily and quickly produce fragrant and high-quality soap
Frequently Asked Questions about Homemade Soap:
What happens if you use soap before the drying process is complete?
The soap can be too harsh for the skin and cause irritation, as the process is not fully complete.
How long does homemade soap last?
Quality homemade soap can last one to two years when stored properly in a dry, ventilated place.
Can caustic soda be replaced with another substance?
In classic methods, it's impossible to create soaps without caustic soda. If you are concerned about working with this material and prefer an easy and safe method, melting a solid soap base is the best alternative.
Sheananda - Quality Bases for Making Natural Soaps at Home
Making soap at home is an art, but it doesn't have to be complicated. If you also want to know how to make natural, fragrant, and high-quality soap, we at "Sheananda" offer you an easy and quick way to do it, guaranteeing wonderful results. On our website, you'll find a selection of high-quality bases for making soap using the Melt & Pour method, which we have been producing in our factory in Israel for 30 years: white soap base, transparent-yellowish, with activated charcoal or with Dead Sea mud.
Our soap bases are made from 100% natural ingredients, including high-quality oils and selected premium butters, based on vegetable glycerin, coconut oil, and castor oil. All you have to do is melt them, add selected essential oils, and pour them into molds. The result - a pleasant-to-the-touch soap that leaves the skin soft and moisturized.
You are invited to browse the types of bases on the website, order the base that suits you and the fragrance oils you love from the website, and enjoy natural, high-quality soap that you made yourself. If you have any further questions or need help choosing products, do not hesitate to contact our professional team on WhatsApp.
"Great soap as a base for making soaps with girls" (Shimrit)